Showing posts with label Bow Dies. Show all posts

Tuesday, September 2, 2025

Sip Sip Hooray!

 Hi everyone and happy Tuesday!

Stacey from Stacey's Creative Corner with you today and
I love having thank you cards in my stash so I decided to make a fun one using some tag dies!

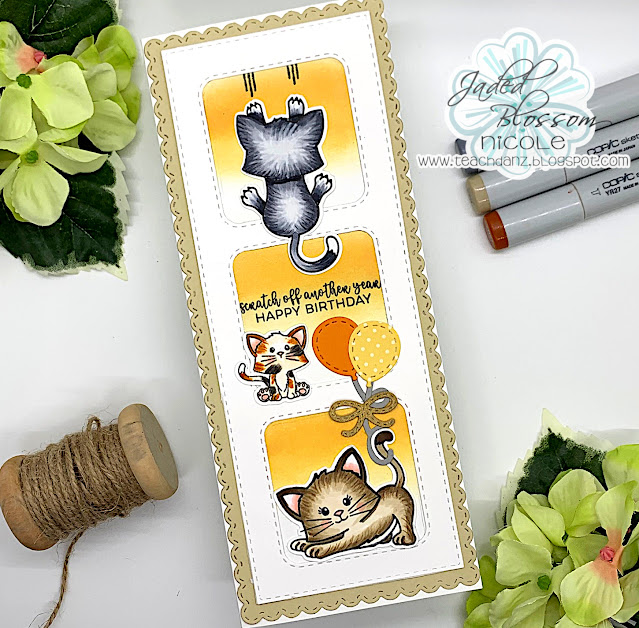
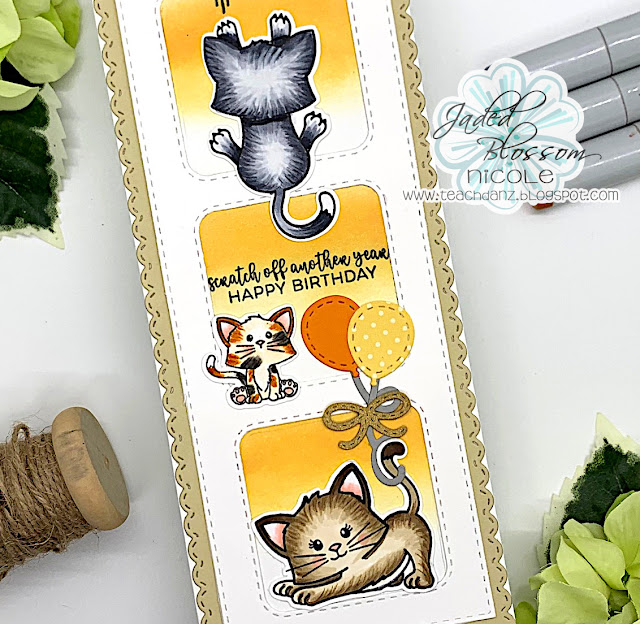
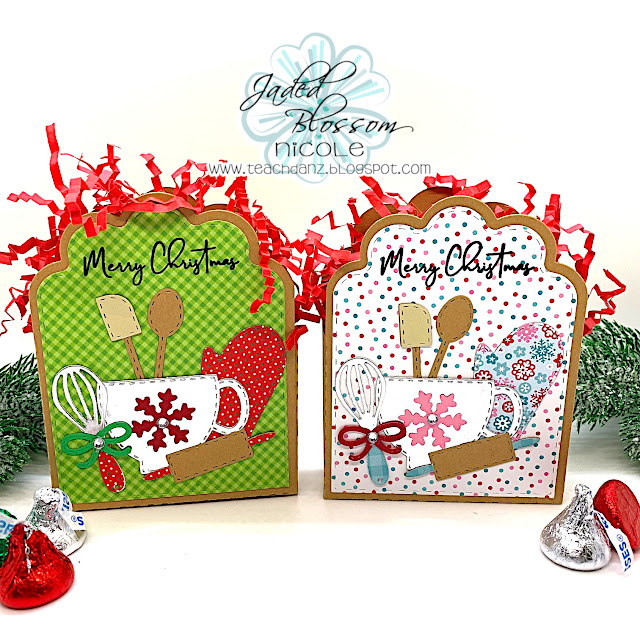
Here is a look at the card that I created:


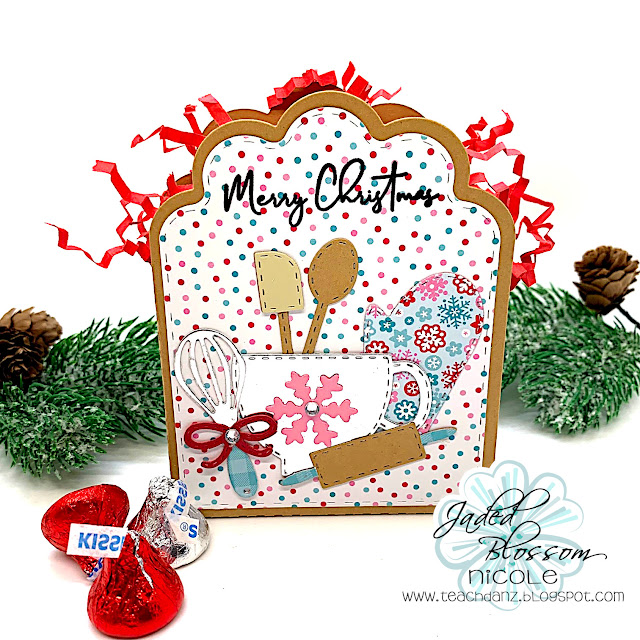
I wanted to have a gift card holder that also doubled as a card so that a message could be written to the recipient & this one was so super simple to make!

I started by cutting the tag from the Pocket Tag Die out twice from some Kraft cardstock. I cut off the pocket on one of the pieces and then scored along the top so that it would bend once it was attached to the tag with the pocket. I stamped the sentiment from the Coffee & Friends stamp set onto the pocket and added some hearts from the Embellishment Clusters Die. I added a striped scallop using some patterned paper and a die from the Pocket Tag Die to the pocket and a coordinating bow that I cut out using the Bow Dies. I added a couple of white Nuvo drops to complete my card. 


This doesn't even have to be used as a Thank You, it could also be used as a random act of kindness :)


Thank you so much for stopping by today and taking a look at my latest creation!
I really appreciate it!
I hope you have a great crafty day!

Wednesday, February 5, 2025

You've Been Struck...

Hi everyone and happy Wednesday!!
 Stacey from Stacey's Creative Corner here today
and I created a fun little Valentine treat bag to share with you.


I used some red cardstock and the Gable Box Die to create my box. I decided I wanted to add a bit more to the box itself so I cut some strips of patterned paper and adhered them around the box, making sure to bend the patterned paper as I adhered it. I assembled my box and set it aside while I worked on my image. I stamped the Cupid Gotcha stamp onto a piece of white cardstock and colored it in with my Copic markers. I wanted to add a little depth so I stamped the image again, fussy cut out three of the hearts and popped them up over the original image with some foam tape. I created a little double bow using the Bow Dies, added a heart to the center using the Embellishment Clusters Die and my little bag was done!
 

So cute!!


Thank you so much for stopping by today!
I really appreciate it!

I hope you have a great crafty day!

Stacey

Wednesday, January 22, 2025

Love Is In The Air...

Hi everyone and happy Wednesday!!
 Stacey from Stacey's Creative Corner here today
and I created a fun Galentine's Day card to share with you.


Here is how I made my card...
I covered a white A2 cardbase with some pretty floral patterned paper and doodled around the perimeter with a dark brown Micron Pen. I created my coffee cup by using the Coffee Slider Die along with the Coffee Slider Add On Die for the Scalloped Sleeve. I stamped my sentiment using some Kraft colored ink and the Kiss Me A Latte stamp set onto my sleeve, centering it the best that I could. I die cut some hearts from the Heart Dies 2, Banner Dies, Embellishment Clusters Die and the Build A Booth: Valentine Add Ons and placed them onto my cup. I used the Bow Dies for a couple of small white bows to add to the bigger hearts and finished my card with a fun pair of lips from the Build A Booth: Valentine Add Ons. 


I just love how this turned out!

I hope you have a great crafty day!

Stacey


Tuesday, November 5, 2024

Rudolph Kisses


Hi everyone...it's my day to take over the Jaded Blossom blog and I have a super fun Christmas card to share. Gotta LOVE the Rudolph dies! Thanks for stopping by...hugs Lee-Ann :)

*pan down to check out all the products that I used

**click HERE to check out my card video


Recipe:
  1. Jaded Blossom-Rectangle dies, Gnome Friends Reindeer dies, Reindeer Faces stamp set, Mini Tag dies 2, Bow dies, Treat Tag dies, Reindeer Droppings stamp set, Reindeer Face stencil
  2. Sunny Studios Joyful Holiday 6" pad
  3. PTI card stock-Pure poppy, Dark chocolate
  4. AC card stock-brown and cream
  5. Neenah desert storm 80lb card stock
  6. Versafine Clair Nocturne ink
  7. Sakura white gelly roll pen #10 and Black Glaze pen
  8. Distress Oxide ink-black soot, gathered twigs, walnut stain
  9. Doodlebug-Dot grid daisy stripe 6", Shape Sprinkles-falling for you, tiny hearts, heart to heart, heart throb
  10. Copic Markers-R29, 0, R20, E35
  11. EK chalk

Wednesday, September 25, 2024

Witchy Wishes!

Hi everyone and happy Wednesday!

Stacey from Stacey's Creative Corner here today
and I have a fun candy bar holder to share with you. 


This was so super simple to make!
I started by creating my candy bar holder using some black cardstock the the Candy Bar Slider Die.
I used the stitched layering piece that comes with the Candy Bar Slider to cut out a piece of pink polka dot patterned paper and glued that to the front. I die cut a white oval using the Stitched Oval Dies and popped that up with some foam adhesive. I built my fun little witch by using the Girl Gnome Die & the Gnome Dies: Halloween Add Ons 2. Once I had her built, I added her to my white oval piece. I stamped my sentiment using the Bewitchy stamp set, inked around the edges and glued it to a double bow that I created using the Bow Dies. I adhered that to the top of my box and then added some puffy star and dot stickers to finish my project.


I added a chocolate bar to the inside.


Isn't it cute? I love how it turned out and so fun to gift!
 These make fabulous little gifts to hand out to your hairstylists, postal workers, nail techs, etc!

Thank you so much for stopping by today!
I hope you have a great crafty day!


Wednesday, September 4, 2024

Great Catch!

Hi everyone and happy Wednesday!

Stacey from Stacey's Creative Corner here today
and I have a fun little treat box to share with you. 


My hubby is a huge football fan so I thought it would be a fun surprise to make him a box to give to him on a game day. Complete with a Gnome in his favorite team colors and filled with some football themed candy for a little snack.

I created my box by using the Gable Box Die and cutting it out from some Kraft cardstock. I trimmed off one of the handle pieces so that my box would remain open. I made my little football player by using the Gnome Dies & the Gnome Dies: Sport Add Ons 1. I inked around the edges of my white stitched panel, added my football player and glued it to the front of my box. 

I stamped my sentiment from the the Root For The Gnome Team with some Versafine Onyx Black Ink and used the Label Shape Dies 1 to cut it out. I cut out the label again, going around the perimeter with a green Copic, and added it to my sentiment label for a little shadow layer. I added it to my box, covering the hole that acts as the handle. I cut a bow using the Bow Dies and some yellow patterned paper and added that to the top of my box, finishing it off with a football from the Gnome Dies: Sports Add Ons 1 for the center of the bow. 


I think this turned out so cute!

Thank you so much for stopping by today!
I hope you have a great crafty day!


Monday, April 15, 2024

Tulip Sympathy Card

Happy Monday my crafty friends!!
I have a sympathy card to share with you today.  
My inspiration for the card is all of the lovely tulips I am seeing 
in my neighborhood!! I pulled out some beautiful pattern paper 
from the Doodlebug Design "Happy Spring" 6x6 paper pad.
I used a card sketch for inspiration too.


I also decorated the inside of my card.


 I used the following Jaded Blossom products on my card today -


Thank you so much for stopping by today!!

Monday, March 25, 2024

Easter Scene Card

Happy Monday my crafty friends!!
I cannot believe Easter is nex weekend!!
I love making Easter craft projects but for some reason this year
I feel as though I haven't gotten to as many of them as I would have liked. 
I sat down this weekend to create an Easter card and this is what I came up with - 


It felt good to play with some Easter products and get myself in the mood for the season!!

I used the following Jaded Blossom products on my card -


All of my pattern paper and embellishments are from Doodlebug Design.

Thanks so much for stopping by today!!


Thursday, May 18, 2023

Happy Birthday to my Favorite Lady

 Hello, crafty friends! Cynthia here sharing a spring themed project today! I am loving this beautiful mellow spring weather lately and I am enjoying playing with foliage and flowers!

I created this birthday tag using the dies from the new sets HAPPY GARDENING, WHEELBARROW DIE, GNOME DIES: GARDEN ADD ONS along with the Bow Dies and the Treat Tag Die. I die cut a cloud border with cardstock and used it as a template for the cloud background.


I die cut the background with the treat die and chose a pink background. I die cut the tulips in the same pink cardstock to match.I die cut the cute little ladybug, added some white ink to the black cardstock and white gel pen. I added some matching green bias tape, red bow die and added a pink beveled enamel dot to finish off the tag.


Thanks for stopping by!


Thursday, March 2, 2023

Wishing You a Happy St. Patrick's Day

Hello, crafty friends! Get ready with your green colored outfits because it's almost St. Patrick's Day!! It's a a celebration of Irish culture, food, and traditions! I am sharing this clover filled card just in time for this festive holiday!


I created this green wreath of different sized clovers from the Build a Booth: Clover Add Ons with different shades of green cardstock. I die cut the bigger bow from Bow Dies and added it to the top of the wreath. I added the sentiment banner using a greeting from Clovers for Sale and added some yellow enamel dots to finish off the card. 

Wishing you all a Happy St. Patrick’s Day filled with corned beef and cabbage and all things green! 

Thanks for stopping by!


Thursday, July 14, 2022

Gingerbread Kisses

 Hello, crafty friends! Cynthia here sharing another Christmas in July project! It is sweltering in my neck of the woods and I continue to dream of cooler winter weather! I created a card to continue my love of all things gingerbread!


Slimlime cards are my jam and it works perfectly for this card. I added some Christmas patterned paper and a paper doily for the background. I stamped the cute little ginger couple from the Gingerbread Wishes stamp set onto kraft cardstock and colored them up width Copic Markers for some dimension. I put them into a die cut bowl and added a stamped rolling pin from the Mrs. Claus Homemade Tag set. I added a sentiment on one of the Mini Tag Dies and finished off the card with a button and twine. 


Thanks for stopping by!


Wednesday, May 11, 2022

Congrats!

Hey Everyone!


Jamie here to share a congratulations card!

I created a congrats card with the Triangle Card Mat Dies! I used the Doodlebug Day by Day paper pad for all the printed paper. Then I used the Congratulations set to add a sentiment by stamping on the outline die and Sentiment Strip Dies. I finished off the card with a the large Bow Die.

Recipe-


Thanks for stopping!
 

Thursday, March 31, 2022

Hippity Hoppity Card

 Hello, crafty friends! Cynthia here sharing an Easter card! I love the feeling of renewal during this time of year. It's a time of refresh, growth, and renewal! 

I used lots of fun products from the store! The Square Mat Die is so versatile and can be used for every season. Just change the patterned papers and its super quick and easy to create a spring card! The Clear Jar stamp set is the perfect foundation also. Just add on one of images and it becomes a happy little jar of marshmallow peeps! I just colored them up with pastel Copic Markers and the jar is finished.


I added a dainty bow from the Bow Dies set, stamped a sentiment from the Floral Bunny Ears stamp set, and die cut with the Mini Tags Die set. This card was super easy and fun!

Supplies:

  • Clear Jar stamp set
  • Clear Jar Spring Add Ons stamp set
  • Bow Dies
  • Mini Tag Dies
  • Triangle Mat Dies
  • Floral Bunny Ears stamp set
  • Simple Stories patterned cardstock
  • Stampin' Up! ink
  • Copic Markers

 Thanks for stopping by!

Monday, February 28, 2022

Scratch Off Another Year

Happy Monday my crafty friends!!
Nicole here today with some Jaded Blossom crafty inspiration for you!!
Today I am sharing a slimline birthday card I created for a special family member. 


I used the following Jaded Blossom products on my card -


I stamped the images out and colored them with my copic markers and prismacolor pencils and then cut them out with my scan n cut.  I did some ink blending in the windows with 2 different distress ink colors.  The sentiment barely fit in the window but I made it work ;)  I think these cats are so adorable and are so fun to color too!!

Here's a closer look at them -


Thanks so much for stopping by today!!

Monday, December 20, 2021

Baking Treat Boxes

 Happy Monday my crafty friends!!

Nicole here today on the JB blog.

I cannot believe it is the Monday before Christmas!!

I am still finishing up a few holiday crafts and have a set of treat boxes to share with you today -


Here are some closeups -


I thought it would be fun to do 2 different colored schemes.


Here is the list of Jaded Blossom products I used on these -


Thanks so much for stopping by the blog today!!
Have a great day!!


Sunday, October 24, 2021

Jingle Bells!


Hi everyone...Lee-Ann here...today we are having a fun Jaded Blossom sponsor day over at the Passionate Paper Creations and Friends Facebook page...YAY! My fav! You definitely want to check it out...HERE...and join the fun! Thank for stopping by...Lee-Ann :)

* If you'd like to make this card too...I have an instructional video on my YouTube Channel...here and Jaded Blossom's YouTube channel here.


**pan down to check out all the products that I used...and click HERE to check out the Jaded Blossom blog...lot's of inspiration!


Recipe:

  • Jaded Blossom-Gnome for Christmas stamp set, Christmas Clear Jar Add Ons stamp set, Border dies, Bow dies, Stitched Rectangle dies, Noel stamp set
  • MME Magic 6" pad
  • Ink on 3 Blackout ink
  • Copic Markers-E07,09,11,13,19   R20   W00,1,3,5,7,9   YR20,23,27
  • Neenah Solar white 80lb card stock
  • Nuvo Vintage drops-Post Box Red
  • Versafine Clair Nocturne ink
  • Distress ink-Wild Honey
  • PTI white card stock
  • AC black card stock
  • Sakura white jelly roll pen #10

Monday, July 26, 2021

Trio of Stocking Gift Card Holders

Happy Monday my crafty friends!!
Nicole here today to share some Jaded Blossom inspiration with you.  
I decided to jump on the "Christmas in July" bandwagon and try
and complete a few Christmas projects ahead of the game.
Do you do this?? I always think it sounds like a great idea so thought I would give it a go.
For today's project, I have a trio set of Christmas gift card holders.


I used the Jaded Blossom "Stocking Gift Card Die" and cut three out with white cardstock.
Then I used the "Buffalo Plaid Stencil" and some red hybrid ink to create the pattern on my stockings.
I pulled out my very neglected embossing folders and used one for parts of the stocking to add some texture.  I cut the bows out using the "Bow Dies" and some gold foil paper.
Lastly I used the "Christmas Dies" and cut out the holly leaves and berries and jazzed them up a bit with a couple of different stickles colors.

Here's a closeup of one of the stockings -


 Thanks so much for stopping by today!!

Monday, March 29, 2021

Easter Basket Shaped Card


Happy Monday my crafty friends!!  Nicole here today to share an Easter card I created.

I cannot believe we are nearing the end of March and that Sunday will be Easter!!

I have had this idea behind today's card in my mind for quite some time now and I finally 

decided to give it a go!! 

Here is the card -


I used the following Jaded Blossom products on my card -


To create the insert of the card I cut the cupcake insert but trimmed most of the top off. Next I used two different sizes of the circle dies and created the handle from them.  I cut the handle with white cardstock and also pattern paper so that it would be sturdy.  I glued the handle onto the card base I had created.  Next I cut the grass layer and then the Easter eggs.  Once I had arranged the eggs where I wanted them I glued the grass onto the eggs and trimmed off any extra egg layers hanging below the grass. Then I glued the grass/egg layer to the base of my card and added the bunny.  The centers of my flowers are created with Nuvo drops.  I am super happy with how the card turned out!!

Thanks so much for stopping by today!!

Monday, February 1, 2021

Fancy Heart Treat Box

Marcia here on the Jaded Blossom blog today with this fun heart-shaped treat box using the new Fancy Heart Die. The construction is easy enough (and sometimes a bit tedious), but you merely need to attach strips of paper to create the box walls.

For the box I created, I cut 1.5" wide strips of the same red paper I used to cut a total of 4 plain stitched red hearts. I then scored each of the strips at 0.25" and cut to the score line as if I was making chunky fringe. I lightly curled the paper strips to help me shape them as I glued the fringe pieces to the solid hearts, creating the box walls. I did that to two hearts, gluing the other two hearts to the inside of the box lid and bottom to hid the fringe and further secure the box's construction. That's really all there is to it!

I decided to add the fancy die cut heart with a mixture of hearts within to the box lid. The tag was cut from the latest Doodlebug Design release, available from Jaded Blossom. I added a white bow with red shadow box to the top of the tag and popped the tag up before adhering to the box lid. Then, I filled with candy! This little box held quite a bit! My youngest daughter swiftly claimed both the box and it's sweet confections within. Have you ever created shaped boxes? What a fun way to expand the use of our die cuts!

Supplies used:
Fancy Heart Die
Bow Dies
Doodlebug Design Made With Love paper stack

___
#thefrolickingfairy #jadedblossom #fancyheartdie #heartbox #paperbox #valentine #valentinetreat #boxofchocolates #bowdies #doodlebugdesign #madewithlove #treatbox #cardmaker #cardmaking #papercraft #cardmakersofinstagram #diy #valentinesdiy

Thursday, November 12, 2020

Thankful Couple

 Hello everyone! Mel from Doxie Mel Designs with a Thanksgiving Decor Idea for you. I cut the Pilgrim couple from the Silhouette Design Store and decorated them with Dies and Stamps from Jaded Blossom. The sentiments are from Happy Fall and are stamped on the Label Dies. 

The bows are cut with Jaded Blossom Bow Dies. The bases are weighted with coins.


Jaded Blossom - Label Dies, Bow Dies, Happy Fall Stamps

Thanks for visiting today!