Thursday, April 30, 2020

Cow Cutie

Hello Everyone! Mel from Doxie Mel Designs with a new card idea for you.  I wanted to color up the cute cow from "Cow Patties" and placed him on a scene created with Jaded Blossom Dies and Cloud Stencil. The sentiment is also from the same stamp set. 


Here is a closer look at this adorable cow. I punched a few flowers to decorate the grassy hill. I LOVE this die, you can find that from our newest Mushroom Dies Set. 


Jaded Blossom
sentiment and cow - Cow Patties
clouds - Cloud Stencil
grassy hill - Mushroom Dies

Thank you for stopping by today, have a wonderful day!


Wednesday, April 29, 2020

Hats Off to the Graduate!

Hi Crafty Friends,

It's Larelyn with another project to share.

  We have some very special young people in our lives who are graduating so I turned to my Jaded Blossom stamps and dies to make them cards.  I chose a simple design that I can change up by using their different school colors.

Here's my design.


I'll be making several more using different colors and accents.

Here are the Jaded Blossom stamps and dies I used:
Hard Work stamp set


Thanks for dropping by today.


Tuesday, April 28, 2020

Welcome Baby!


Hi everyone...Lee-Ann here and it's my day to take over the Jaded Blossom blog and I have a Z fold Baby card to share...and I also have a video of the Card Construction. Thanks for stopping by...Lee-Ann :)
**pan down to see all the products that I used and check out the Jaded Blossom Youtube channel to see the video of making this card...start to finish-HERE


Recipe:
  1. Jaded Blossom-Rectangle Internal Scallop dies, Baby dies, Card Mat dies, Snips and Snails, Mini Human, Rounded Tag dies
  2. PTI white card stock
  3. Nuvo Crystal Drops Simply white
  4. Memento Luxe ink-Gray Flannel
  5. Carta Bella Rock a Bye Baby 6" pad

Sunday, April 26, 2020

Animal Challenge Winner!

Happy Sunday! We had so many amazing projects entered into our Animal Challenge! Thank you to everyone who entered. It's time to announce our winner!! 

Congratulations DONNA!! She used our Panda's are Awesome stamp set, and Triangle Square Mat Die. 


She even stamped the inside! 


Congratulations again! Please email us at admin@jadedblossom.com to claim your prize.


~Candace and Michelle 

Friday, April 24, 2020

Kawaii Weather :)


Hi My Friendly Bloggers!
 This is Cindy from Cindy's Scraptastic Designs, It's my day to post over
at Jaded Blossom. Today is my BIRTHDAY!!!
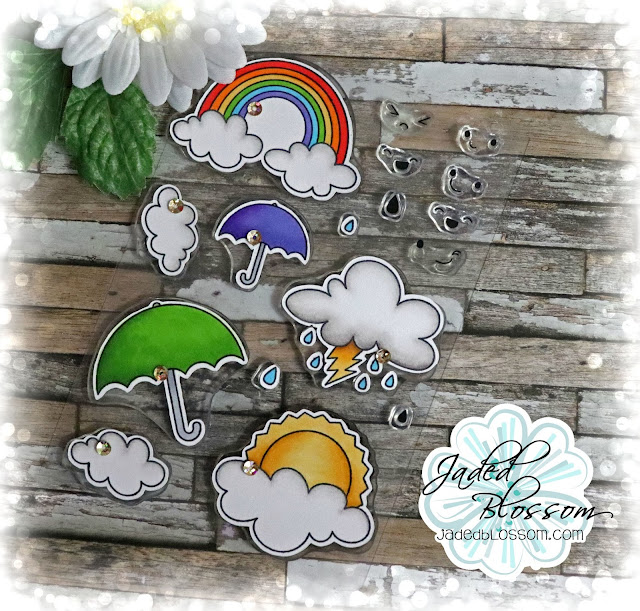
For today I colored some images with summer theme that will be added to the store so it will give you a better look at the stamp sets and also give an idea on how to color them!!! I have the Kawaii Weather and Aloha... I have the colors I used down below.
 
 Copic for this set - GREEN - YG25, PURPLE - BV12, ORANGE - YR04, BLUE - B02,
RED - R24, GRAY - C2, YELLOW - YR21, YR24
 
 Copic for this set - GREEN - G24, G28,  BROWN - E13, E17, E18
 
 Thank you for stopping by and have a GREAT Weekend!!!


Thursday, April 23, 2020

Happy Birthday!

Hey Everyone!

Jamie here to share a birthday card with you!

I used the Daisies Set to created the layered flowers on a Card Mat Die. Then I Stamped a sentiment from So Many Birthdays 3 to the Flag Dies 1 and 2. I finished off the card with some twine and sequins!

Recipe- 

Thanks for stopping!

Tuesday, April 21, 2020

Guest Designer Rosemary!

Happy Tuesday everyone! I'm back sharing my last Guest Blog Post for Jaded Blossom. I've had an amazing time, and want to thank all the ladies at Jaded Blossom for having me this month! It's been so much fun coloring and creating projects using their products! You definitely need to check out the Jaded Blossom Store and grab your faves. You will LOVE them!

 Today, I'm sharing a 4"x4" mini pizza box using the most adorable unicorn from the Unicorns and Glitter Stamp Set. You can do a google search to find a tutorial for the pizza box. It just uses one 6"x11" piece of paper (scored an inch from all sides and then at 5" and 6" on the long side of the paper). It's a really easy box to put together. I then made three mini 3.5" x 3.5" cards to go inside of the box. 


To create the background clouds I cut several cloud borders from paper using a die-cut (you will want one border for each color so the colors don't mix as you are blending). The pastel clouds were created using Distress Oxide Inks.   TIP:  If you don't have a cloud border die cut, you can easily draw scallops free-hand on paper and then cut it out.  Also, if you don't have any of these inks, you can use chalk with a cotton ball or Q-tip! It's how I used to make clouds before I got the inks.

Copics: Unicorn Body: C0, C1, C2, C3, C5, Colorless Blender Ear: R11, R21, R22 Mane: Black, RV09, RV06, RV02  Hooves: RV02, RV04, RV06, RV09 Horn: YR02, YR04, YR09. Y06, YR21, YR23, YG23, YG25, YG67, BG34, BG13, V15, V17, R83, Star Dust Stickles
The grass at the bottom was created using one of the dies from the Mushroom Die Set. I stamped the sentiment onto the grass piece and then adhered it to the front of the box and mini cards using foam tape so it's raised up. I also put foam tape behind the unicorns. Next, I covered the sides of the box with rainbow striped paper.


For the inside of the box I cut a Scallop Square from pink cardstock and then a Stitched Square from decorative paper. I stamped another sentiment from the Unicorns and Glitter Stamp Set onto the pattern paper so when the recipient opens the box they have a greeting waiting for them. There is also another greeting at the bottom of the box (under the unicorns cards).


Remember, you have until May 2nd to enter the current RAINBOW CHALLENGE for a chance at winning a stamp set of your choice! For more inspiration head over to the Jaded Blossom Blog! And be sure to check out the Jaded Blossom Store for all your stamps and gift giving supplies. They have various Cutting Dies to make party favors along with Favor Bags and Boxes. 
Hugs,
Rosemary

Monday, April 20, 2020

Guest Designer Rosemary!

Happy Monday everyone! I'm back today sharing a Panda Birthday Card along with a tutorial on how I created the background using die-cut and Distress Ink. This adorable panda from Jaded Blossom is part of the Pandas Are Awesome Stamp Set. I colored this cutie with Copics.
Copics:
Panda: C0, C1, C3, Colorless Blender
Eyes: B000, B95, B97
Pink: R81, R83, R85
Bamboo: YG23, YG67, E42 
The background behind the panda was creating using die cuts and Distress Ink. You are going to be amazed at how easy it is! For the grass area, I used the grass die from the Mushroom Die Set and cut the grass border from paper. You will need to keep both sides of the cut-out. I used a cloud border die-cut to create the clouds and a circle die to cut the frame. If you use a die-cut that has a stitched border, you will want to cover the backside with tape so the ink doesn't go through the little holes. I forgot to do that step and you will see what happens later, haha!
  
STEP 1: 
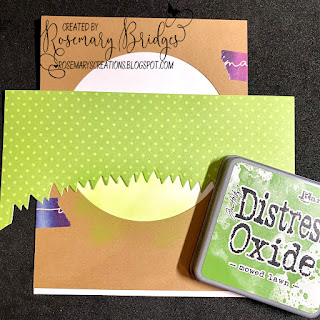
My total card size is 4.25 x 5.5. I originally started with that size of white cardstock, but (later after creating the scene) I trimmed it smaller so I could mat it with black paper). I cut a piece of tan cardstock 4.25 x 5.5 and then cut a circle from it. I didn't cut it exactly in the middle. I raised it towards the top so I would have room to stamp a sentiment. I used the grass die from the Mushroom Die Set and cut the green polka dot paper (I used pattern paper so it's easier to tell the difference in the pictures). You will need to keep both sides of the paper.
STEP 2: 
Tape the 4.25 x 5.5 tan cardstock with the hole in the middle to your white cardstock with washi tape so it doesn't move around.
STEP 3: 
Lay the "scrap" grass cut-away towards the bottom of the circle cut-out. I used a makeup toothbrush foundation blender brush to spread the Mowed Lawn Distress Ink using a circular motion. To get a smooth blend, ink up your blending brush and start the circular motion on the tan cardstock and move towards the white paper. Do multiple light layers to build up the color.
 This is what the grass will look like when you pull the green paper away.
 
STEP 4:
Take the other grass die-cut and cover up the stitched lines on the back with scotch tape. Line it up to the area that was colored in green. You will now start blending Broken China Oxide Ink along the grass border die-cut.
This is what it looks like after you have layered the Broken China Distess Ink several times along the grass border. You can see in this photo that I forgot to cover the stitched lines on the back side of the grass die-cut so the blue ink seeped through the stitched holes and made marks on my green paper.
STEP 5:
I cut some white cardstock using a cloud border die and used it as my template for the cloudy sky. I line up the scallops in different arrangements and using the makeup brush I go along the top of the cloud border edge. When I get closer to the grass, I turn the cloud border upside down and ink it the other way so it "closes" off the the clouds.
STEP 6:
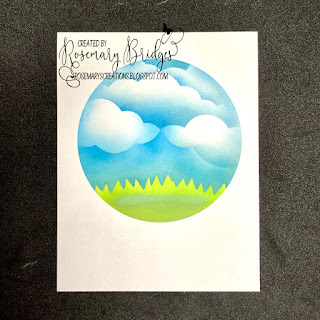
After you pull off the tan cardstock, you now have your inky scene! To try and fix the blue stitched lines on the grass. I took a wet paintbrush and went across the dots to lighten the blue. Then I went over the area with more green Distress Ink. It did leave a line, but once I added the Panda it looked more like a shadow underneath him so I didn't go back and start over.
 STEP 7:
I stamped the sentiment below the scene. I decided I wanted to add a black mat behind this panel so I trimmed it down. Then I added a black mat before placing it on the card base. The panda is raised on foam dots for extra dimension.
 
See you back here tomorrow with another card! Be sure to check out the Jaded Blossom Store for all your stamps and gift giving supplies. They have various Cutting Dies to make party favors along with Favor Bags and Boxes. 
Hugs,
Rosemary

Toucan of Thanks!!! :)


Hi My Friendly Bloggers!
 This is Cindy from Cindy's Scraptastic Designs, I took an extra day to post over
at Jaded Blossom. For today I colored some images with Animals, they will be added to the store so it will give you a better look at the stamp sets and also give an idea on how to color them!!! I have the Elephantastic and Toucan of Thanks....
 I also added the Copic colors I used on all of the sets....
 
COPIC for this set - PINK - RV32, RV34, BLUE - BG53, BG57, GRAY - C2, C4, C5
 
COPIC for this set - PINK - RV32, RV34, BLUE - B91, B93, B95, B97,  BROWN - E23, E25, E27, RED - R24, R29, GRAY - C9, ORNGE - YR04, YR07, GREEN - G43, G46,
PURPLE - V15, V17
 
 Thank you for stopping by and have a GREAT Week!!!