Showing posts with label Stacey. Show all posts

Tuesday, September 2, 2025

Sip Sip Hooray!

 Hi everyone and happy Tuesday!

Stacey from Stacey's Creative Corner with you today and
I love having thank you cards in my stash so I decided to make a fun one using some tag dies!

Here is a look at the card that I created:


I wanted to have a gift card holder that also doubled as a card so that a message could be written to the recipient & this one was so super simple to make!

I started by cutting the tag from the Pocket Tag Die out twice from some Kraft cardstock. I cut off the pocket on one of the pieces and then scored along the top so that it would bend once it was attached to the tag with the pocket. I stamped the sentiment from the Coffee & Friends stamp set onto the pocket and added some hearts from the Embellishment Clusters Die. I added a striped scallop using some patterned paper and a die from the Pocket Tag Die to the pocket and a coordinating bow that I cut out using the Bow Dies. I added a couple of white Nuvo drops to complete my card. 


This doesn't even have to be used as a Thank You, it could also be used as a random act of kindness :)


Thank you so much for stopping by today and taking a look at my latest creation!
I really appreciate it!
I hope you have a great crafty day!

Tuesday, August 19, 2025

Pumpkin Spice

 Hi everyone and happy Tuesday!

Stacey from Stacey's Creative Corner with you today 
and I am starting to feel the Fall Vibes (it's my favorite season)! 
I decided to make a card to have on hand to send out when it's officially time on the calendar haha!

Here is a look at the card that I created:


I had so much fun with this one!
I started by creating a white scallop using the Scallop Rectangle Dies 2 and layering a piece of patterned paper inside that I cut out using the Rectangle Dies 2. I wanted to add a little pop of orange, so I trimmed down a piece of orange patterned paper and added that to the center and then added the entire piece to a Kraft A2 cardbase. I cut out my mug using the Gnome Dies: Coffee Add Ons and added a little whipped topping, from the same set. I tucked in a little pumpkin that I cut out using the Gnome Dies: Fall Add Ons and added a little enamel heart. I stamped my sentiment from the Coffee Shop stamp set and cut it out using the Candy Wrap Dies, modifying the cut just a little so that it fit my sentiment better. I adhered it on my cup and placed my cup onto a piece of vellum that I cut out using the Scallop Circle Dies. I popped it up onto my card with foam tape and added a small leaf from the Gnome Dies: Fall Add Ons, and some little gems in the corners, to complete my card.


For the inside, I just used some of the printed words from the patterned paper pack and added one of the extra leaves that I had leftover.


Thank you so much for stopping by today and taking a look at my latest creation!
I really appreciate it!
I hope you have a great crafty day!


Tuesday, July 29, 2025

Holy Mackerel!

Hi everyone and happy Tuesday!

Stacey from Stacey's Creative Corner with you today
and I wanted to share a card that I made to add to my birthday card stash.

Here is a look at the card that I created:


I started by creating a card base from some blue cardstock and layering a white mat that I cut out using the Rectangle Strip Card Mat Die on top. I used the Rectangle Strip Card Mat Die twice more to cut out some patterned paper strips that I could inlay into the rectangle openings. I used the Ticket Book Die to create a "frame", adding my sentiment from the Fish On stamp set to the bottom before adhering it to my card front. I built that adorable little gnome using the Gnome Dies, Gnome Dies: Gnome Face Add Ons 1, Gnome Dies: Girl Gnome Face Add Ons & Gnome Dies: Fishing Add Ons and added him above my sentiment.


Fun right?


Thank you so much for stopping by today and taking a look at my latest creation!
I really appreciate it!
I hope you have a great crafty day!

Tuesday, July 15, 2025

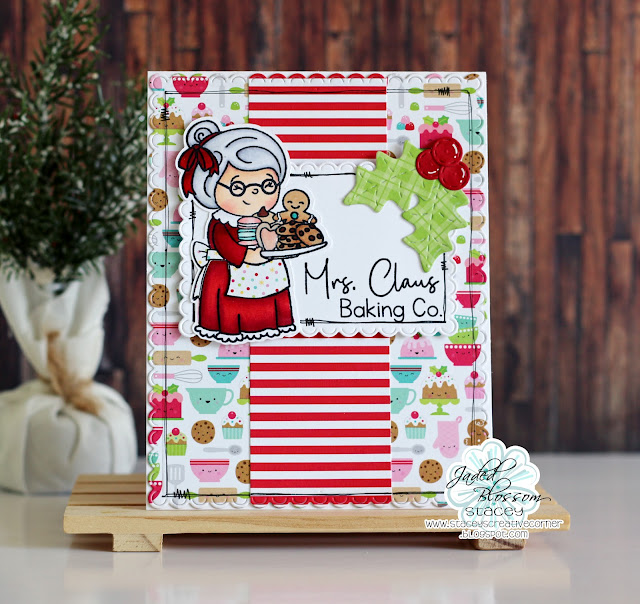
Mrs. Claus Baking Co.

Hi everyone and happy Tuesday!

Stacey from Stacey's Creative Corner here and keeping with the "Christmas in July" mindset that I am currently in, I decided to make a Christmas card to add to my stash for this upcoming holiday season to share with you. 

Here is a look at the card that I created:


Isn't this Mrs. Claus the sweetest? I just think she is so adorable!
I created my card by using the Scallop Rectangle Dies 2 and cutting out two pieces of patterned paper. I cut down the striped patterned paper into a 1.75" strip and adhered it to my other piece of patterned paper before adding them to my white A2 card base. I cut out a smaller scallop by using the Scallop Rectangle Dies 2 once again and stamped my greeting from the Mrs. Claus Baking Co. stamp set into the bottom right corner. I added some doodling and then popped up the sentiment piece onto my card with foam tape. I stamped Mrs. Claus with some Memento Tuxedo Black ink and colored her with my Copic markers. I fussy cut her out and added her to my sentiment panel. I added some holly from the Christmas Dies and some more doodling to the perimeter of my card to complete the look. 


I added just a touch of sparkle to her hair bow and to the center of the heart cookie. 

One Christmas card down, many more to go haha!


Thank you so much for stopping by today and taking a look at my latest creation!
I really appreciate it!
I hope you have a great crafty day!

Wednesday, June 25, 2025

Some Days...

Hi everyone and happy Wednesday!

Stacey from Stacey's Creative Corner here and today I'm sharing a card that 
 I created to offer some encouragement, or even just a good ol' laugh, using one of those adorable little dogs that was just released this month from the Gnome Friends: Dog Dies.  

Here is a look at the card that I created:
 

How fun right??

To create my card, I started with a white A2 card base and added some blue patterned paper that I cut out using the Stylized Rectangle Dies. I used the Stylized Rectangle Dies again to cut out a piece of green and brown patterned paper, so that I could match up the stitching along the edges. Once I had them cut out, I used the Mushroom Dies to create a grassy hill and the Tree Swing Die to cut out a tree branch and added them both to my card. I created the hydrant by using the Gnome Dies: Firefighter Add Ons, popping up some of the layers with foam tape for a little dimension. I built my little doggy by using the Gnome Friends: Dog Dies, added some enamel dots for his eyes, and placed him next to the hydrant. I stamped my sentiment using the Dog Gone Awesome Stamp set with some Versafine Onyx Black Ink and used the Dog Gone Awesome Outline dies to cut it out. I added a little enamel dot to the hydrant and a few random white doodles to complete my card. 


This sentiment just makes me giggle! I'm sure we've all had days like that right? lol


Thank you so much for stopping by and taking a look at my latest creation!
I really appreciate it!
I hope you have a great crafty day!

Wednesday, June 4, 2025

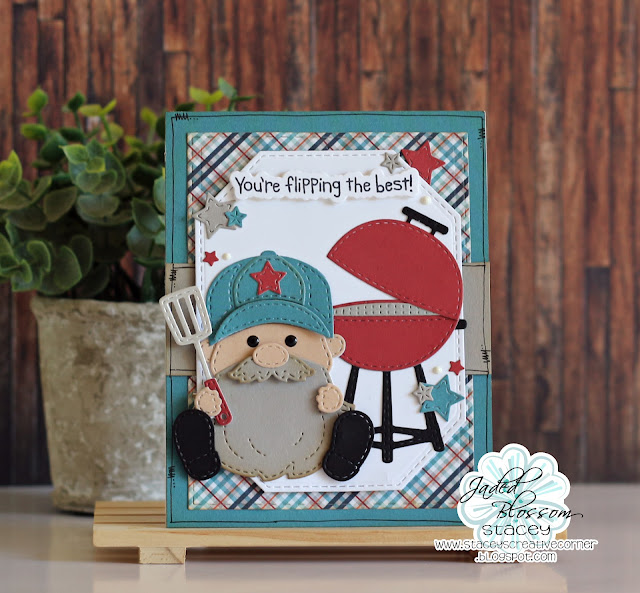
You're Flipping the Best!

Hi everyone and happy Wednesday!

Stacey from Stacey's Creative Corner here and today I'm sharing a card that I
 created that would work great for Father's Day or even as a Thank You. 

Here is a look at the card that I created:


I started by covering a white A2 cardbase with some blue toned patterned paper. I used the Rectangle Dies 2 to cut out a piece of plaid paper and glued that to the front of my card. I added a strip of gray cardstock and then doodled around the perimeter of my card. I die cut some white cardstock using the Octagon Dies and popped that up onto my card front with some foam tape. I used the Gnome Dies: BBQ Add Ons to create the little grill and added that to my Octagon panel. I built my little man using the following dies: Gnome Dies, Gnome Dies: Gnome Face Add Ons 1, Gnome Dies: Sport Add Ons 1 (Hat) & the Gnome Dies: BBQ Add Ons (spatula). I added him next to the grill and placed my sentiment above him using foam tape.  I used the Grilling With My Gnomies stamp set and the Grilling With My Gnomies Outline Dies for the sentiment. I added some stars from the Banner Dies and Embellishment Clusters Die onto my card and added a couple of white Nuvo drops for a finishing touch.


Adorable!!


Thank you so much for stopping by today and taking a look at my latest creation!
I really appreciate it!
I hope you have a great crafty day!

Wednesday, May 21, 2025

Bee Kind

 Hi everyone and happy Wednesday!

Stacey from Stacey's Creative Corner here today and I'm sharing a card that I created that would be great for a notecard...no occasion needed.
It's always a good day when the mail has something other than bills or junk mail right?

Here is a look at the card that I created:


I can't get enough of those adorable little bees that were released earlier this month!
 Not to mention, the sentiment from the Bee Kind Stamp set was perfect for the notecard that I wanted to create also! Win Win!

Here's how I made my card....I started with an A2 white cardbase and used the Scallop Rectangle Dies 2 to cut out a piece of patterned paper to layer onto the front. I took a piece of notebook themed paper, from the same patterned paper stack, and trimmed it down so that only the stripes were showing and added that to my card over my scallop panel. Next I used the Stitched Arch Dies to cut out a piece of Vellum and some blue patterned paper, adhered them together and glued that to the front of my card. I created some flowers using the Flower Dies and attached them to the bottom left hand corner of my Stitched Arch. I stamped my sentiment from the Bee Kind stamp set and used the coordinating Bee Kind Outline Dies to cut it out, popping it up with some foam tape onto my card front. I completed my card by adding 3 little bees from the Gnome Dies: Beekeeper Add Ons.


I think this turned out so sweet and cute!!


Thank you so much for stopping by today! 
I really appreciate it!
I hope you have a great crafty day!

Wednesday, April 30, 2025

Sugar and Spice!

 Hi everyone and happy Wednesday!

 Stacey from Stacey's Creative Corner here today
and I created a sweet baby girl card to share with you.


My daughter asked me to make a card for one of her friends who is expecting a sweet little girl and this stamp from Jaded Blossom called Snips and Snails was perfect for the job!

I started by creating an A2 card base from white cardstock and layering a piece of floral patterned paper on top that I cut out using the Scallop Rectangle Dies 2. I stamped my greeting using the Snips and Snails onto a piece of white cardstock and used the Rounded Tag Die to cut it out. I stamped the image again onto a piece of patterned paper and fussy cut the images out so that I could pop them up with foam tape. I used the Rounded Tag Die again to cut out my backing layer, along with the small scallop border, and added a hole protector from the Luggage Tag Dies.  I tied a bit of white cording into a big bow and mounted my tag onto a piece of vellum that I cut out using the Rectangle Dies 2. I was able to pop my vellum up onto my card front, hiding the foam tape behind the tag. I completed my card with a few enamel hearts. 

I think this came out so cute!


Jaded Blossom Products Used:
Snips and Snails
Scallop Rectangle Dies 2
Rectangle Dies 2
Rounded Tag Die
Luggage Tag Dies

Thank you so much for stopping by today!
I really appreciate it!

I hope you have a great crafty day!

Stacey


Wednesday, April 16, 2025

Bunny Bait!

 Hi everyone and happy Wednesday!

 Stacey from Stacey's Creative Corner here today
and I have one last Easter project to share with you.


I couldn't resist making a little booth to hold some carrot shaped chocolates in.
I started by creating my booth base by using white cardstock and the Build A Booth die, along with the Build A Booth: Treat Box Add Ons. I covered the front of my box with more white cardstock but using the dies that come with the Build A Booth Die to get that awesome wood-grain stitching detail on the pieces, adding some little black enamel dots for the "nails".  I used the Build A Booth: Easter Add Ons to create the little carrot banner on the front. Next, I die cut some letters using the Build A Booth: Alphabet Add Ons to spell out "Bunny Bait" and adhered them to the top of my booth. I built that adorable bunny using the Gnome Friends: Bunny Die, Gnome Friends: Bunny Face Add On and the Bunny Friend Faces. I used the big carrot from the Build A Booth: Easter Add Ons for the carrot she is holding and gave her a little bow with some orange crochet thread to complete my box.  


So cute!!


Thank you so much for stopping by today!
I really appreciate it!

I hope you have a great crafty day!

Stacey


Wednesday, March 26, 2025

Easter Goody Bag!

Hi everyone and happy Wednesday!

 Stacey from Stacey's Creative Corner here today
and I created an adorable Easter goody bag to share with you.


For my project, I started by creating my treat bag using some white cardstock and the Goody Bag Die. I used the layering die that comes with the Goody Bag Die to cut out a piece of blue patterned paper so that I could build a little scene. I used the Spring Dies to cut out a piece of green patterned paper to create some grass and adhered that down, being sure to not add the adhesive all the way to the top. I used the Gnome Dies: Easter Add Ons to create my little Easter basket and filled it with some eggs that I cut out using the Build A Booth: Easter Add Ons. I tucked my basket behind the top of the grass, tilting it just a bit for a little whimsy. I stamped the bunny from the Large Bunny stamp set with Tuxedo Black Memento Ink onto some Copic friendly paper and did some simple coloring. I cut him out using the Large Bunny Outline Dies and popped him up onto my bag with some foam tape. I added some black enamel dots for his little eyes and some glasses using the Glasses Dies. I stamped my sentiment, also from the Large Bunny stamp set, and popped it up above the bunny with more foam tape. 

To close my little bag, I simply used a hole punch to create a small hole, threaded some plaid ribbon through and tied white ribbon into a bow to keep the plaid ribbon in place. 


I placed some white paper shred and some little Easter candies inside.


Thank you so much for stopping by today!
I really appreciate it!

I hope you have a great crafty day!
Stacey

Wednesday, March 12, 2025

Lucky Vibes!

Hi everyone and happy Wednesday!

 Stacey from Stacey's Creative Corner here today
and I created a St. Patrick's Day themed card to share with you.


To create my card, I started by creating a white A2 cardbase and adding a yellow layer that I cut out using the Scallop Rectangle Dies 2 on top. Next I used the Window Card Mat Die and cut it out of some white cardstock, as well as 2 different patterned papers. I added the white frame on top of my yellow scallop panel and filled in the windows with the patterned papers. I used the Octagon Dies to cut out a piece of Vellum and then heat embossed my sentiment, from the Lucky Vibes stamp set, with some black embossing powder. I built my pot of gold using the Gnome Dies: Pot Of Gold Add Ons and added it above my sentiment. I was able to hide some foam tape behind the pot so that my Vellum piece could be raised up off of my card front for a little dimension. I completed my card by adding a little four leaf clover that I cut out using the Build A Booth: Clover Add Ons and a little green enamel heart. 


Thank you so much for stopping by today!
I really appreciate it!

I hope you have a great crafty day!

Stacey

Wednesday, February 26, 2025

Get Well Wishes

Hi everyone and happy Wednesday!

 Stacey from Stacey's Creative Corner here today 
and I have a Get Well Soon card to share with you.


I don't know about your area, but there seems to be a lot of cold and flu cases in mine so I thought I better have a card to have on hand just in case. 

I created an A2 cardbase from some white cardstock and covered the front with some dotted patterned paper. I added a strip of blue patterned paper along one side and doodled around the perimeter with a black Micron pen. I used the Stylized Rectangle Dies and cut out a piece of plaid patterned paper and layered it on top of a white Stylized Scallop Rectangle Dies. I popped it up onto my card with some foam tape and started building my little bear. For my bear, I used the Gnome Friends: Bear Die, Bear Faces and the Gnome Dies: Medical Add Ons. Once I had my bear built, I popped her up onto the front of my card and added a little pink bow to her hair. I stamped my sentiment from the Speedy Recovery stamp set, used the Mini Tag Dies 3 to cut it out and tucked one end under my bear. I finished my card with a heart from the Banner Dies, some puffy stickers and a couple of white Nuvo drops.   

I'm pretty sure that this cute little bear would make anyone feel better. 


Thank you so much for stopping by today!
I really appreciate it!

I hope you have a great crafty day!

Stacey

Wednesday, February 5, 2025

You've Been Struck...

Hi everyone and happy Wednesday!!
 Stacey from Stacey's Creative Corner here today
and I created a fun little Valentine treat bag to share with you.


I used some red cardstock and the Gable Box Die to create my box. I decided I wanted to add a bit more to the box itself so I cut some strips of patterned paper and adhered them around the box, making sure to bend the patterned paper as I adhered it. I assembled my box and set it aside while I worked on my image. I stamped the Cupid Gotcha stamp onto a piece of white cardstock and colored it in with my Copic markers. I wanted to add a little depth so I stamped the image again, fussy cut out three of the hearts and popped them up over the original image with some foam tape. I created a little double bow using the Bow Dies, added a heart to the center using the Embellishment Clusters Die and my little bag was done!
 

So cute!!


Thank you so much for stopping by today!
I really appreciate it!

I hope you have a great crafty day!

Stacey